Digital printing
Large format printing
Post processing
Offset printing
Screen printing
Digital printing
Submit the artwork as PDF file (preferably prepared by Adobe Creative Suite applications). Every page is to be centered on the media (use auto centering instead of centering manually). Do not impose the pages on media.
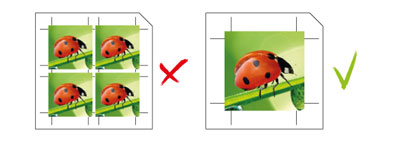
Save the PDF according to the PDF/X-1A rules. This option is provided by all proffessional graphic software. It ensures the flattening of all transparent objects, effects, shadows etc.
Use images with resolution higher than 200 dots per inch.

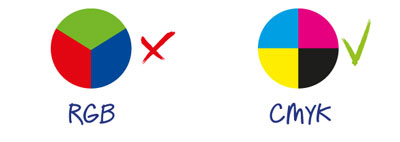
Use CMYK color space for your design, instead of RGB color space. In case if Pantone colors are used, these can not be 100% matched by digital printing. Please request the hard proof copy (avaliable for an additional fee) before printing, if the color is critical. Pantone colors such as Silver, Gold or Bronze cannot be printed digitally.
Use Crop marks to define the boundaries of an artwork. Add 3mm bleed for any element of an artwork that is going over the trimming edge. Use extra marks to clearly show the folding/creasing lines.

Avoid using Overprint on color or white objects.

It is advised to name the file in the most descriptive manner, making it clear for us which print job it is.

Artwork supplied on disk or Flash drive must be accompanied by a colour proof. Any artworks supplied electronically must be accompanied by a proof PDF or JPG.
Large format printing
Submit the artwork as TIFF, JPG (use high quality settings), PDF (according to the PDF/X-1A standart).
Use image resolution 100 dpi or higher.

Use CMYK color space for your design, instead of RGB color space.

Define the cutting size of your artwork by adding cropmarks. Add at least 2mm bleed for any element of an artwork that is going over the trimming edge.

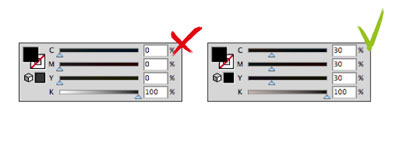
For rich black, use composite black color: C30, M30, Y30, K100.
All the text should be outlined (converted to curves). For best results, do not use letters smaller than 9pt.

For TIFF format, do not use layers, alpha channels or clipping paths. For PDF file format, save as PDF/X-1A. This option is provided by all proffessional graphic software. It ensures the flattening of all transparent objects, effects, shadows etc.
For multiple page PDF, every artwork should be centered on the artboard. All the pages should be the same size. Do not impose.

Name the file in the most descriptive manner.

Do not use Overprint on color or white objects.

Post processing
If your job is to be cut out, attach the cutting guide in a separate file. It should match the print file in the means of scale and the position of crop marks. Also submit the JPG preview file, where the final look of the product is clearly shown. The creasing / perforating lines should differ by color from the cutting lines to avoid confusion.
The cutting blades in the form should be separated by at least 2mm, and creasing blades – by 3mm.
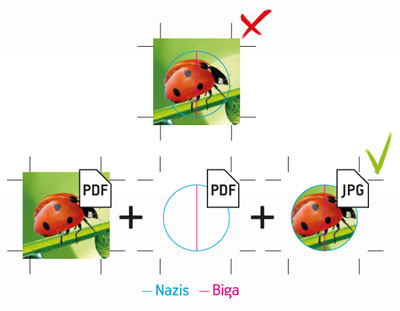
A separate file is required for fragmentary UV varnishing. It should match the print file in the means of scale and the position of crop marks. Avoid UV varnishing in the folding/creasing areas.
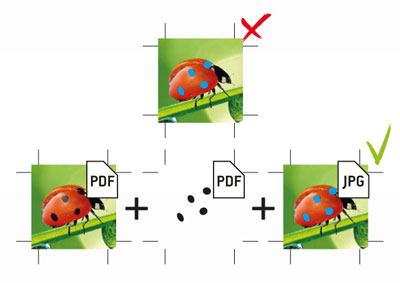
For spiral bound jobs, reserve 1cm margin on the wire side of page in your artwork.
For numbering, define the number range and the prefix (of needed). Example: AE000001-AE000528.
All the text prepared for laser cutting, plottering, die cutting, hot foil etc. should be outlined (converted to curves).

Use only vector objects for die cutting, laser cutting and plotter cutting. Do not use images.

For embossing and foil stamping artwork, use the lines thicker than 0.2mm. The guide file should be prepared in vectors in a separate document. The location of the guide relatively to the page should match the placement of the artwork. Submit both the artwork and the punching/foil guide files as PDF files according to the PDF/X-1A rules. Attach the preview JPG or PDF file.

Offset printing
Submit the artwork as PDF file (preferably prepared by Adobe Creative Suite applications). Every page is to be centered on the media (use auto centering instead of centering manually). Do not impose the pages on media.

Save the PDF according to the PDF/X-1A rules. This option is provided by all proffessional graphic software. It ensures the flattening of all transparent objects, effects, shadows etc.
Use images with resolution 300 dots per inch.

Use CMYK color space for your design, instead of RGB color space. In case if Pantone colors are used, define these as spot colors after Pantone Solid formula guide.

Use Crop marks to define the boundaries of an artwork. Add 3mm bleed for any element of an artwork that is going over the trimming edge. Use extra marks to clearly show the folding/creasing lines.

Avoid using composite colors (for example, C86, M50, Y46, K100) for small letters (below 9pt) and thin lines (below 0.35mm / 1pt). Instead, use plain black (C0, M0, Y0, K100).
For rich black color in your design, use C30, M30, Y30, K100.

Avoid using Overprint on color or white objects.

It is advised to name the file in the most descriptive manner, making it clear for us which print job it is.

Artwork supplied on disk or Flash drive must be accompanied by a colour proof. Any artworks supplied electronically must be accompanied by a proof PDF or JPG.
Screen printing
Define the cutting line around your artwork by adding cropmarks. Add 3mm bleed for any element of an artwork that is going over the over the trimming edge.

Define every color by Pantone Solid formula guide.
Avoid using images in the screen printed jobs. If some part of an artwork comes as an image, use black and white (not Grayscale) bitmap image with resolution no less than 600dpi. Do not use halftones, gradients or transparencies in your artwork.
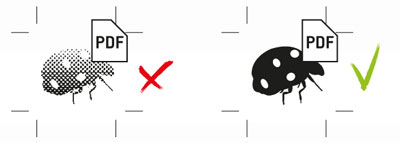
For fragmentary varnish, clearly show where the varnish shall be applied.
All the text should be outlined (converted to curves).
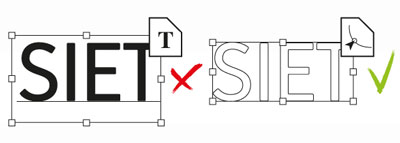
Minimal line thickness for screen printing is 0.2mm.
Name the file in the most descriptive manner.

Props
SIA “NRJ reklāmai”
Reģ. Nr. 40103461844
PVN reģ.Nr. LV40103461844
IBAN LV48UNLA0050017632647
© Copyright NRJ REKLĀMAI, 2024